Import and export — functional guide
Use the Import Center to prepare, validate and apply spreadsheet data, and the Export Center to request campaign workbooks. These two centers exist only in legacy for now, including when opened from the current navigation. See the configuration guide for access and preparation and the technical guide for implementation details.
Before you begin
These are privileged HR/administrator operations. A manager workspace alone does not grant access. Your administrator must enable the relevant center and grant its permissions; campaign exports also depend on the corresponding performance module. Have an approved file, know the intended company, language and repository, and understand whether you are creating or updating records.
| Term | Meaning |
|---|---|
| Import type | The business data being loaded, such as users, jobs or job–skill links. It is separate from CSV/Excel file format. |
| Matching | Assigning each source column to a supported destination field. |
| Validation | Checking prepared rows before applying them to business records. |
| Imported rows report | A report for one import, including recorded changes. It is not the campaign Export Center. |
| Campaign export | A background request for 1to1 or People Review workbooks. |
Import data
Find and review an upload
- In the manager area, open Settings → Import Center.
- Review Type of file, File Name, Number of Errors, Created At, Uploaded By, Status and Actions.
- Narrow the history with search or file type, then choose the action offered for the upload's current stage.
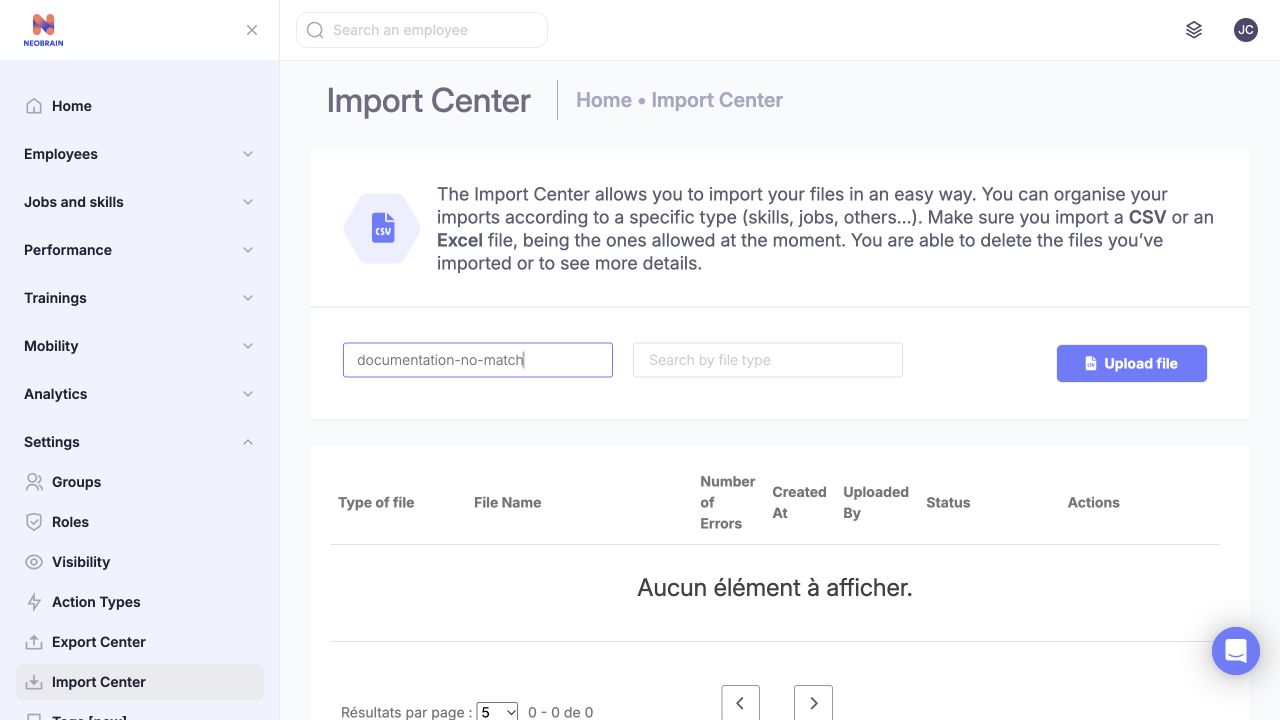
A filename search is active and the history shows no matching upload. Clear the search or change the file-type criterion to broaden the list. Search filters the displayed history; it does not delete an upload.
| Control | Values, initial state and clearing | Effect and illustrative use |
|---|---|---|
| Search | Free text; clear it to remove the restriction. Clear the text to remove the restriction. | Filters searchable history cells immediately. Enter part of a known filename to locate an upload. It does not search the contents of the uploaded workbook. |
| Search by file type | Multiple selection; initially empty. Choices come from types present in history. Remove selected chips to clear. | Several types match with OR; the type filter and text search combine with AND. For example, limit results to Users or Jobs, then narrow by filename. |
| Results per page | 5, 10, 25, 50, 100. | Changes the number of history rows displayed; page arrows move through matches. |
| Upload file | Opens a preparation dialog. | Creates no business record merely by opening it. Confirming a file starts upload and parsing. |
| Row action / bin | Depends on processing stage and permissions. | Matching, Preview and Download file are different steps. The bin deletes an upload record when permitted; it does not reverse imported records. |
The import-history filters combine as described in the table above.
Upload one file
- Choose Upload file.
- Choose the business import type, the worksheet number and one genuine CSV or Excel file.
- For Interview Answers, also choose the campaign.
- Review the choices and choose Confirm when ready to start. Cancel closes the dialog; reopening starts with an empty file/type selection.
- Return to history and refresh to follow parsing. A completed transfer is not a completed business import.
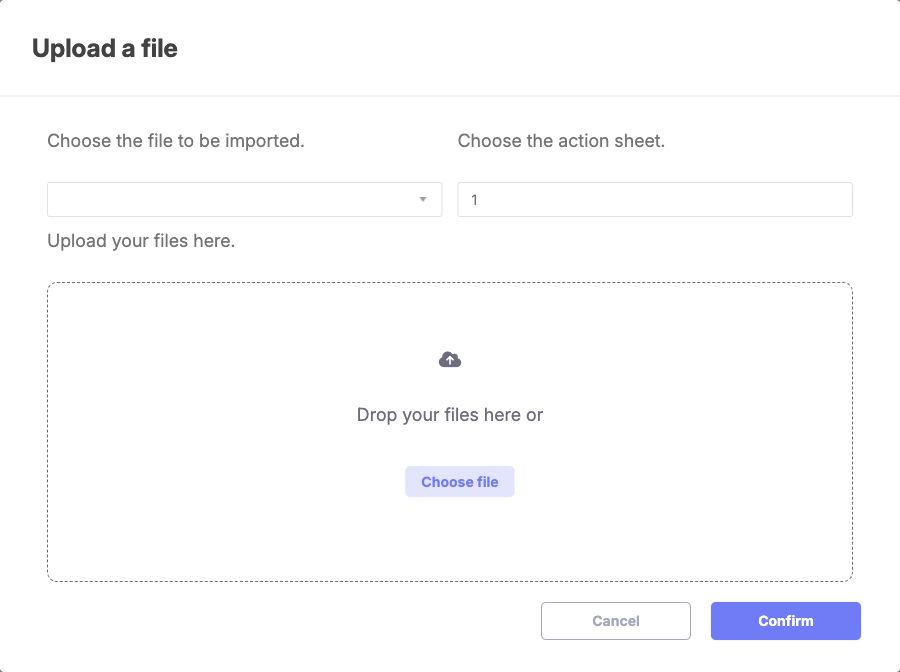
The upload dialog separates import type, worksheet number and file selection. Choose the type and source file before confirming. The worksheet number starts at 1.
| Upload option | Choices and behavior |
|---|---|
| Choose the file to be imported | Single choice, initially blank: Skills, Jobs, Jobs Offers, Jobs&Skills, Users, Hierarchical Relationships, Visibility groups, Formations, Formations&Skills, Campaigns, Users&Skills, Interview Answers. Some labels retain legacy vocabulary: Formations means trainings. |
| Choose the action sheet | Numeric worksheet position, initially 1; 1 means the first worksheet. Only one worksheet is parsed for this upload. Use 2 for a second-sheet source, for example. |
| Choose the campaign | Conditional single selector for Interview Answers, initially blank. Lists company interviews; a campaign selection is required for that type. |
| Choose file / drop area | One nonempty CSV, XLS or XLSX file. Selecting or replacing the file changes the preparation form; Confirm sends it. The client checks format and the environment's configured upload-size limit. The maximum size depends on the environment. |
| Confirm | Initially disabled until the preparation conditions are met. |
Place column headings on the first row and keep the data in a continuous block. If the selected worksheet does not exist, choose a valid worksheet number and upload the file again.
Match columns, validate and preview
Follow these steps after the file has been parsed.
- When parsing finishes, choose Matching for the upload. Compare source headings and the first data-row example with the destination fields.
- Assign the intended destination field to each useful source column. Leave unwanted columns unmapped. Map each required destination field once; do not map multiple source columns to the same target.
- Select a company language and repository where offered. User imports also require the displayed data-protection acknowledgement. These choices belong to this upload; they do not change the application's interface language or activate a new repository.
- Submit matching and wait for validation. Open Preview once available.
- Review Rows to be Imported and, when present, Invalid Rows. Scroll horizontally to read the error explanations. A row in the valid tab has passed validation; it has not yet been imported.
- For incorrect source data, prepare a corrected upload or edit the error-marked cells offered in Invalid Rows and choose Revalidate rows. Inline edits save the staged row when leaving the field; they are more than a display filter. Revalidation must finish before continuing.
- Return to matching if the mapping itself is wrong, where the workflow offers that action. Review the newly validated preview.
| Matching option | Source, selection and effect |
|---|---|
| Destination field | One target per source column, initially blank or restored from that upload's previous mapping. Options depend on import type and eligible Smart Editor fields. Changing the choice changes how the staged data will be interpreted. |
| Language | One active company language. Choose the language for the translated values in this upload. |
| Repository | A company repository offered for import types that support repositories, including skills, jobs and related links. Choose an available repository; unavailable selections fail validation. |
| Campaign type | Conditional choice for Campaigns imports. Choose the type that matches the campaign data. |
| Data-protection acknowledgement | Required checkbox for Users. It is not a substitute for the company's approval of the input data. |
Create a new skill in the company’s default language before importing its translation in another language. The interface language and the selected import language can differ from the company’s default language.
Common required mappings are title + code for Skills and Jobs; civility, first name, last name, email for Users; skill code, job code, proficiency, importance for Jobs&Skills; and email, skill code, note for Users&Skills. Other types have their own field definitions: follow the required indicators and validation messages. For Users, use one of the allowed civility values shown by the import template. See configuration before mapping role, active-state or login-message columns.
Illustrative example: a job–skill file connects an existing job code to an existing skill code with the expected proficiency and importance. Import the reference jobs and skills first; the link import should not be treated as creating both catalogues.
Apply and verify
- In the validated preview, review the valid and invalid row counts.
- Choose Import and wait for processing to finish.
- Compare the imported count with the intended count.
- Reopen representative records in the relevant user, job, skill or training page to check the imported values.
The worker processes valid rows and validates them again. Invalid rows are excluded. An interruption can leave some records already changed; investigate the result before submitting the file again.
Users are matched by company and email; jobs and skills by company, repository and code. The selected language controls translated values. An existing match may be updated; available update fields depend on the import type.
| Stage | Available action / expected result |
|---|---|
| Parsing | Matching disabled; wait and refresh. |
| File uploaded | Matching available. |
| Validating | Preview disabled; wait and refresh. |
| Match done | Preview available; business data is still staged. |
| Importing | Download disabled; wait and refresh. |
| Imported | Download file reports imported rows and recorded changes; compare counts. |
| Parsing / validation / import failed | Have an administrator inspect the failed stage before retrying; partial import is possible. |
The bin is shown for completed/interrupted stages allowed by the interface, not while processing. Deleting an upload is history cleanup, not a rollback. Keep the required evidence before cleanup.
Export campaign data
Choose campaigns and request an export
- Open Settings → Export Center in the manager area.
- Choose 1to1 or People Review. A tab appears only when its module is available, your role can view it and company campaigns exist.
- Search and filter campaigns, then tick the intended rows. Review the selection count.
- Choose Export to CSV, or the equivalent export action in a row's … menu for a single campaign. See details opens that campaign instead.
- Wait for the background generation and delivery email. The export action is labeled Export to CSV, but the campaign files are delivered as XLSX workbooks in a ZIP archive.
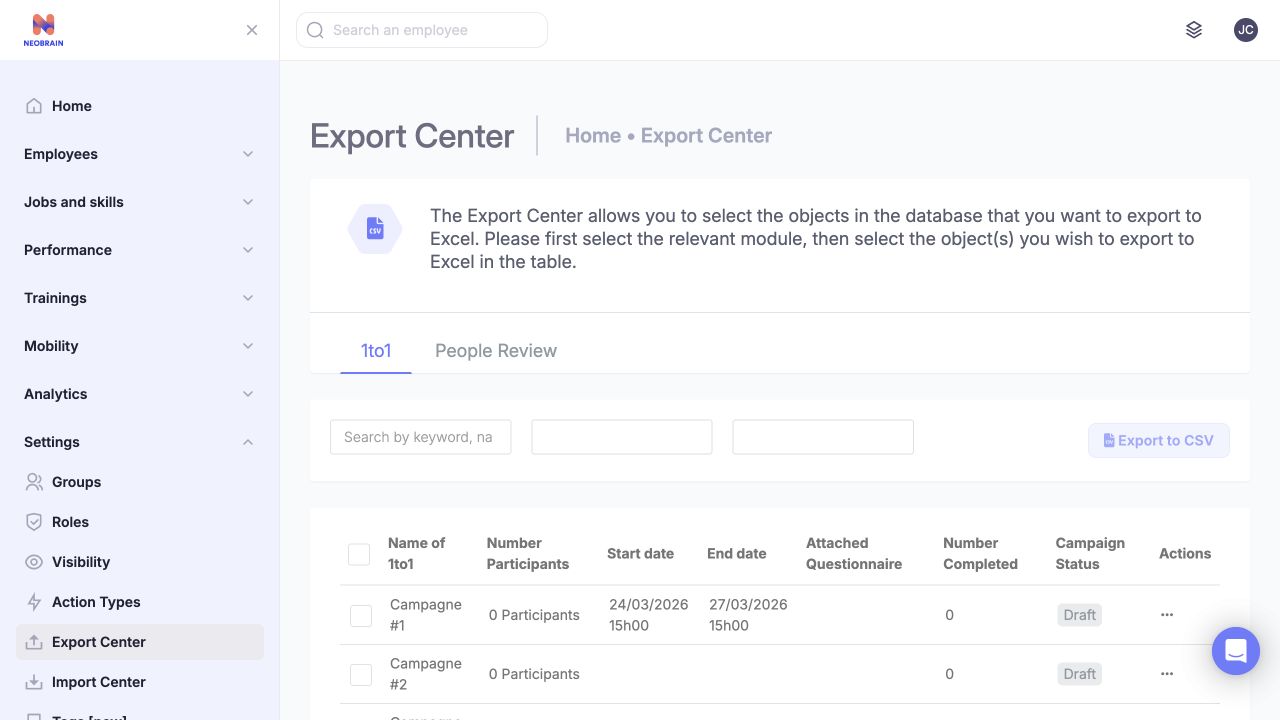
The module tabs and campaign checkboxes define the export scope. Review the selected module and rows before requesting files. Use the table filters to narrow the campaign list.
| Control | Choices, defaults and effect |
|---|---|
| Module tab | 1to1 / People Review when available; 1to1 was initially shown. Each table has its own filters and selection. |
| Search | Free text, initially empty, applied immediately to searchable campaign cells. Clear text to broaden results. An illustrative use is part of a campaign name. |
| Questionnaire | Multiple selection from attached-questionnaire values present in that table. Initially empty; remove choices to clear. Values within this filter use OR. |
| Status | Multiple selection from campaign statuses present, such as Draft in the English 1to1 view. Initially empty. Values within the filter use OR; different filters and search combine with AND. |
| Row checkbox / header checkbox | Initially unchecked. The header selects all filtered rows, potentially across pages. The request collects checked rows in the currently filtered result set. Review filters and the count before exporting. |
| Cancel selection | Unchecks the filtered rows and disables the export button. Selections hidden by other filters can remain; clear the filters and inspect selections before starting another request. Closing the selection message alone does not clear the checkboxes. |
| Results per page / arrows | 5, 10, 25, 50, 100; initially 5. Changes display, not the export's selected campaign scope. Table ordering is disabled. |
| … → Export / See details | Requests one campaign's export or opens its detail page. No checkbox selection is needed for the single-row export. |
The 1to1 table shows participant and completed counts; the checked completed count requires a completed interview and both employee and manager signatures. People Review shows participant and distinct reviewer counts. Counts describe campaign records, not completion of an export request.
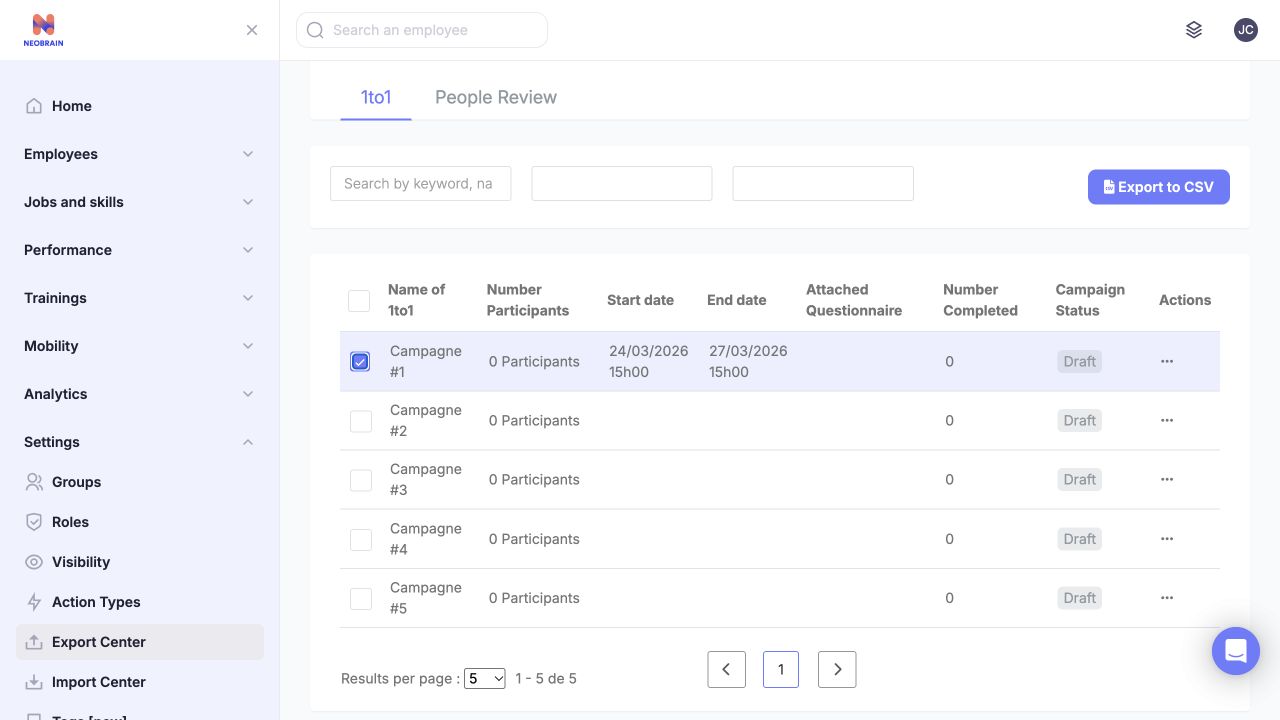
A selected campaign enables the export action and displays the selection count. Review the campaign and count before continuing; selecting a row does not generate or deliver a file.
The confirmation message means generation has started. Wait for the delivery email before downloading the completed files.
View imported information as an employee
Import Center and Export Center are administrator tools. Employees can review information made available in their profile or campaign pages and contact an administrator if imported information appears incorrect.

The personal workspace provides access to employee information and campaigns. Import and export operations are handled by an authorized administrator.
Troubleshooting and FAQ
| Symptom | What to check |
|---|---|
| Center or campaign tab is missing | Confirm the manager workspace, center activation, role permissions and relevant campaign module with the administrator. |
| No history result | Clear both text and file-type restrictions; change page if needed. Filtering does not remove uploads. |
| Upload rejected | Use a genuine CSV/XLS/XLSX, one nonempty file, an available worksheet and a file below the configured limit. Re-save a mislabeled spreadsheet in a supported format. |
| Matching fails | Map required fields and choose an allowed language/repository; acknowledge the required Users checkbox. |
| Validation finds errors | Read the invalid-row messages, correct source data or offered staged cells, and revalidate. Do not assume valid rows mean the entire file is acceptable. |
| Processing seems stuck | Refresh once, note the upload and stage, then ask support to inspect processing. The older guide's timing examples are not a service-level guarantee. |
| Imported count is lower than expected | Check invalid rows, revalidation failures and interruption before submitting the file again. |
| Export email is missing | Confirm requester, selected module/campaigns and mail delivery with support. Avoid repeated requests until generation status is checked. |
| Can an export be re-imported unchanged? | No round-trip contract is established. Export reports and import schemas serve different purposes; prepare a supported import file and mapping. |
Interface generations
Import and export options depend on the module and interface generation. Use the workflow shown in your workspace and see the technical guide for implementation-specific details.
Last updated on 3 November 2026